I hope you all had a terrific Thanksgiving. I'll post a little about ours in a day or two.
We’re perhaps a little late in the month, but November is usually a pretty good time to plant trees and shrubs at Almost Heaven South and we dare not let another warm spell go by without getting ours in the ground. We have three cherry trees in a grouping and wanted a fourth, so we bought another Yoshino (which gives us two) to go with the two Kwanzans. Since seeing the cherry’s around the tidal basin in D.C., we’ve decided we wanted a grouping of them in our yard. They are beautiful in the spring with the only drawback being their close-to-the-surface roots, which make it difficult for the grass. My Apr 7 & 14 posts had shots of them from this spring.
Since many of you have commented about enjoying my gardening tips, I decided to use this as a tree, or shrub, planting tutorial. This is where the cherry goes and has no grass because it still had one of those rubber mulch things from where the previous tree died. The new tree is in a 5 gallon pot and hereinafter is called a root ball whether from a pot or wrapped in burlap.
The whole should be dug about twice as big as the root ball at the top and a little bigger than the ball at the bottom. It’s important that the hole not be dug too deep so that the root ball is sitting on undisturbed ground (and therefore not able to sink deeper) and sticking an inch or two above the ground level.
The sides, especially in clay should be scarfed up a little to provide the roots and easier way out. Clay can become like a pot and cause the roots to stay in the hole. I just slice it with the side of the shovel.
Before putting the root ball in the hole, it’s a good idea to rough up (tease) the roots on the outside of the root ball, to encourage them to grow outward or they can keep growing in a circle and girdle the tree. If you're planting a balled in burlap root ball, set it in the hole, loosen the burlap and put in all in the bottom of the hole or cut off the excess then tease the roots as needed. Trying to unwrap, then set it in the whole will often result in the root ball falling apart - not a good thing. See how the roots are now sticking outward.
Set the root ball in the hole and get the main part of the trunk plumb – this one was a little curved at the bottom. This is an example of not plumb enough.
Refill the hole with the same soil that came out. Amending the soil, as used to be done, encourages the roots to stay in the soft, rich, soil of the planting hole rather than move out into the main soil. I had one that did this and eventually had to cut it down because it would never stand up by itself, as the main roots went round and round in the planting hole. Fill the hole about ¾ full and tamp down some, but not too tight, then add water until it won’t take anymore, which settles the soil and forces out the air pockets (which will dry out the roots). Finish filling with soil to the original level, water this soil in, and if on a slope, I like to build a little dam at the bottom to trap the water for a couple of years. As you can see, I'm dealing with chunks of damp clay.

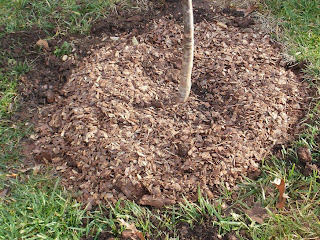
Finally add mulch, to prevent drying out, 2-3 inches deep and ensuring it is a couple of inches back from the bark (this is true for all mulching). Bark is great at protecting the tree from the elements, but it is not designed to protect it from the organizims, moisture, diseases, and bugs that may be in the mulch – soil, mulch, etc. should never be placed against the bark - as it can rot the bark and kill the tree. This is finished and it has a good base and small top, so I think it will be okay without tieing it off to stakes, but I'll check it in the spring to be sure. If it had leaves on it, as many spring planted trees do, I would stake it - 3 stakes, 60 degrees apart tied around the trunk just above the first set of branchs. Be sure the loop around the trunk is big enough to allow the trunk to expand.
I’ve posted before about the many azaleas we have in our landscaping, so Bev bought some more to replace some we’ve lost over the years. These, however, will be our first that bloom all summer – Bev’s sis has some and we like them a lot. See my April 28 blog for some shots from this spring's blooms. The new ones were all in 1 gallon pots which I greatly prefer as they are considerably cheaper, require only a growing season or two to be at the 3 gallon size and best of all they only require a 1 gallon hole be dug.
Glad this job is behind us for this year. Several weeks ago, I'd posted some shots of our fall colors and mentioned the Japanese maples were still green, but here they are a few days before Thanksgiving and just a little past their prime.
And lastly, after several very hard frosts, can you believe all of our knockout roses are still blooming - here's a shot of one. That's a hardy banana behind it - it didn't care for the frost.
Have a great day and thanks for stopping by.
Larry


I'm totally bookmarking this post for the far off day in the future when I have a garden of some sort. Thanks! Hope you had a great Thanksgiving!
ReplyDeleteExcellent tutorial Larry.
ReplyDeleteAs an ex professional landscaper and now currently a lover of all plants I couldn't have said it better. I would love your growing zone. It has most of my favorites like azaleas and rhododenrons but also much more "softer" plants.
I spent about 20 of my 36 years in the landcsaping industry and you think I would hate it now but nope!
Love the Japanese maples.
I've seen root balls that have completely wound around themselves and didn't realize I needed to tease them. Great post Larry. It's 12 degrees here in Denver, so don't believe I'll be teasing any root ball today. Think I'll stay inside and tease some leftovers. :-)
ReplyDeleteWe haven't done any fall planting this year. I was so bummed about the drought and the hours spent watering, my heart wasn't in it.
ReplyDelete